2016-07-11

Customizing Firefox Search Engines

Being very annoyed by not having a POST search engine by default, I dug a bit into FF's search engine configurations. Some online articles/posts were somehow not working for FF 47, noting how I got this done here, for future reference.

Ref 1 2 3

Why

You can surely easily add search engines in FF addons markets, but unfortunately the POST version of my favorite search engine is somehow not working for me. If you are unlike me and happy with what you have, don't bother continuing.

How

  1. First, quit FF.
  2. Then check in the FF profile folder, there should be one or more files named starting with search. In my case, there were search.json.mozlz4, search.json, search-meta.json.
  3. Delete all of them, so that FF could recheck all available search plugins in searchplugins folder.
  4. Create searchplugins if you don't have one.
  5. Create an XML file with a sensible name, and create the search engine specs in this file with OpenSearch format.
  6. If an existing plugin is available for reference that's great. Otherwise, try using a tool to build from scratch, e.g. with mycroft project tool.
  7. Make sure the XML file is valid. Start up FF.
  8. Go to about:preferences#search, and the new search plugin should be visible in the list.


Update 20190131


Updated prior ref pointed to this comment, which does not require touching anything in FF folder. What worked for me was:
  1. Go to about:config
  2. Open JS console
  3. Run Services.search.addEngine("file:///path/to/your/opensearch.xml", null, null, false);
Startpage's OpenSearch XML could serve as a template, and a prior ref could serve as a reference for how to add POST parameters. XML that I used was:

<SearchPlugin xmlns="http://www.mozilla.org/2006/browser/search/" xmlns:os="http://a9.com/-/spec/opensearch/1.1/">
<os:ShortName>Startpage</os:ShortName>
<os:Description>Startpage Search</os:Description>
<os:InputEncoding>UTF-8</os:InputEncoding>
<os:Image width="16" height="16" type="image/x-icon">https://www.startpage.com/assets/images/logo-16x16.png</os:Image>
<os:Url type="text/html" method="POST" template="https://www.startpage.com/do/dsearch">
  <Param name="query" value="{searchTerms}"/>
  <Param name="prfe" value="36c84513558a2d34bf0d89ea505333adb92ef6e4f6ab17dad119096d3b428afa984abfd0db70840b"/>
</os:Url>
<SearchForm>http://startpage.com/</SearchForm>
</SearchPlugin>

2016-06-13

Misc settings with Tomcat

Force HTTPS connections

In conf/web.xml:
<security-constraint>
    <web-resource-collection>
        <web-resource-name>SSL Content</web-resource-name>
        <url-pattern>/*</url-pattern>
    </web-resource-collection>
    <user-data-constraint>
        <transport-guarantee>CONFIDENTIAL</transport-guarantee>
    </user-data-constraint>
</security-constraint>

Disable JSESSIONID/CSRF URL rewrite

In conf/web.xml:
<session-config>
   <tracking-mode>COOKIE</tracking-mode>
</session-config>

Tomcat with Let's Encrypt cert on Ubuntu 16.04

Ref

Goal

To get Let's Encrypt's cert work with Tomcat container.

How

Install and get a LE cert

sudo apt install letsencrypt
sudo letsencrypt certonly
It should ask for email, the domain this machine is at.

Converting LE's certs to PKCS12 format

Get root, cd into letsencrypt's cert folder indicated by last command, and run:
openssl pkcs12 -export -in cert.pem -inkey privkey.pem -out sslcert.p12 -name tomcat -CAfile chain.pem -caname root
Move the p12 cert to a place tomcat can see.

Configure Tomcat to use the cert

Edit conf/server.xml, enable the 443 connector.
Add the attributes in this connector:

keystoreFile="sslcert.p12" keystoreType="PKCS12" keystorePass="[change_to_your_password]"
Restart Tomcat, and the https should be working.

Tomcat 8, authbind on port 80/443, systemd with Ubuntu 16.04

Ref 1
Ref 2
Ref 3

Goal

I'd like to be able to use the upstream/downloaded Tomcat, running as a standalone, serving 80/443 ports, and starting automatically with system boot.
Below is based on vanilla Ubuntu 16.04 image from Google Compute Engine.

How

Install Java

sudo apt install default-jdk-headless

Add tomcat user and group

With --system so that this user could not sign in system.
sudo addgroup --system tomcat
sudo adduser --system --ingroup tomcat tomcat

Unpack Tomcat installation

Download apache-tomcat-8.0.35.tar.gz. Then:
tar xf apache-tomcat-8.0.35.tar.gz
sudo mv apache-tomcat-8.0.35 /home/tomcat/
sudo chown tomcat:tomcat -R /home/tomcat/apache-tomcat-8.0.35

Install and configure authbind

sudo apt install authbind
sudo touch /etc/authbind/byport/{443,80}
sudo chmod 500 /etc/authbind/byport/{443,80}
sudo chown tomcat:tomcat /etc/authbind/byport/{443,80}

Configure Tomcat

sudo sed -i 's/8080/80/g' /home/tomcat/apache-tomcat-8.0.35/conf/server.xml
sudo sed -i 's/8443/443/g' /home/tomcat/apache-tomcat-8.0.35/conf/server.xml

Configure authbind

sudo vim /etc/systemd/system/tomcat.service
Then paste in the content:

[Unit]
Description=Tomcat Container
After=network.target

[Service]
Type=forking

Environment=JAVA_HOME=/usr/lib/jvm/java-8-openjdk-amd64/jre
Environment=CATALINA_PID=/home/tomcat/tmp/tomcat.pid
Environment=CATALINA_HOME=/home/tomcat/apache-tomcat-8.0.35
Environment=CATALINA_BASE=/home/tomcat/apache-tomcat-8.0.35

ExecStart=/home/tomcat/apache-tomcat-8.0.35/bin/startup.sh
ExecStop=/home/tomcat/apache-tomcat-8.0.35/bin/shutdown.sh

User=tomcat
Group=tomcat
RestartSec=10
Restart=always

[Install]
WantedBy=multi-user.target
After saving:
sudo systemctl daemon-reload
sudo systemctl enable tomcat.service
sudo systemctl restart tomcat.service

2014-04-13

Configuring Apache Shiro (shiro-web) without shiro.ini

Intro

Apache Shiro is a Java security framework, for authentication, authorization, etc.
Tutorials online I found[1,2,3] are all built around /WEB-INF/shiro.ini. Since Servlet 3.0 you can live a life without web.xml completely, so I think it's also possible to get rid of shiro.ini.
Below it shows the (almost) minimal code needed to translate shiro.ini into Java code.

Environment

Eclipse WTP 4.4M6
Tomcat 8.0.5
Java 7

Steps

  1. Create a dynamic web project.
  2. Mavenize the project.
  3. Add Maven dependencies:
    Maven dependencyNote
    org.apache.shiro:shiro-web:jar:1.2.3
    org.apache.tomcat:tomcat-api:jar:8.0.5It's needed for current Luna version
  4. Create ShiroFilter.java:
    import javax.servlet.annotation.WebFilter;
    
    @WebFilter("/*")
    public class ShiroFilter extends org.apache.shiro.web.servlet.ShiroFilter {
    }
    
  5. Create ShiroListener.java:
    import javax.servlet.ServletContextEvent;
    import javax.servlet.ServletContextListener;
    import javax.servlet.annotation.WebListener;
    
    import org.apache.shiro.web.env.EnvironmentLoaderListener;
    
    @WebListener
    public class ShiroListener extends EnvironmentLoaderListener implements
        ServletContextListener {
    
      @Override
      public void contextInitialized(ServletContextEvent sce) {
        sce.getServletContext().setInitParameter(ENVIRONMENT_CLASS_PARAM,
            HelloWebEnvironment.class.getName());
        super.contextInitialized(sce);
      }
    
    }
    
  6. Create HelloWebEnvironment.java:
    import org.apache.shiro.web.env.DefaultWebEnvironment;
    
    public class HelloWebEnvironment extends DefaultWebEnvironment {
    
      public HelloWebEnvironment() {
        super();
        setFilterChainResolver(HelloHelper.getFilterChainResolver());
        setSecurityManager(HelloHelper.getSecurityManager());
      }
    
    }
    
  7. Create HelloHelper.java:
    import org.apache.shiro.mgt.SecurityManager;
    import org.apache.shiro.realm.text.IniRealm;
    import org.apache.shiro.web.filter.authc.FormAuthenticationFilter;
    import org.apache.shiro.web.filter.authc.LogoutFilter;
    import org.apache.shiro.web.filter.mgt.DefaultFilterChainManager;
    import org.apache.shiro.web.filter.mgt.FilterChainManager;
    import org.apache.shiro.web.filter.mgt.FilterChainResolver;
    import org.apache.shiro.web.filter.mgt.PathMatchingFilterChainResolver;
    import org.apache.shiro.web.mgt.DefaultWebSecurityManager;
    
    public class HelloHelper {
    
      private static SecurityManager securityManager = null;
      private static FilterChainResolver filterChainResolver = null;
    
      public static SecurityManager getSecurityManager() {
        if (securityManager == null) {
          SimpleAccountRealm realm = new SimpleAccountRealm();
          realm.addAccount("jack", "abca1234", "employee");
    
          securityManager = new DefaultWebSecurityManager(realm);
        }
        return securityManager;
      }
    
      public static FilterChainResolver getFilterChainResolver() {
        if (filterChainResolver == null) {
          FormAuthenticationFilter authc = new FormAuthenticationFilter();
          authc.setLoginUrl("/login.html");
          LogoutFilter logout = new LogoutFilter();
    
          FilterChainManager fcMan = new DefaultFilterChainManager();
          fcMan.addFilter("authc", authc);
          fcMan.addFilter("logout", logout);
          fcMan.createChain("/logout", "logout");
          fcMan.createChain("/**", "authc");
    
          PathMatchingFilterChainResolver resolver = new PathMatchingFilterChainResolver();
          resolver.setFilterChainManager(fcMan);
          filterChainResolver = resolver;
        }
        return filterChainResolver;
      }
    
    }
    
  8. Create login.html:
    <html>
    <body>
      <form method="post">
        <table>
          <tr>
            <td><input name="username" type="text" /></td>
          </tr>
          <tr>
            <td><input name="password" type="password" /></td>
          </tr>
          <tr>
            <td><input type="submit" value="Submit" /></td>
          </tr>
        </table>
      </form>
    </body>
    </html>
    

Key points

With the code above, you should be able to start authenticate with jack:abca1234. Some key points:
  • ShiroFilter inherits Shiro's own ShiroFilter, annotated essentially just to bring the Shiro machinery into the Servlet container.
  • ShiroListener is similar to ShiroFilter, inheriting EnvironmentLoaderListener, annotated, with some custom logic to plug HelloWebEnvironment in.
  • HelloWebEnvironment is a custom class to set up Shiro environment. This is the key part to get rid of shiro.ini, which is used by IniWebEnvironment.
  • HelloHelper has 2 functions setting up a FilterChainResolver and a SecurityManager, which are essential for Shiro's operation.
    • Realm configurations are associated with SecurityManager.
    • FilterChainResolver requires a configured FilterChainManager, which is in charge of mapping URLs to filters.
  • In login.html, the form element should have no action attribute.

2014-02-01

Setting up a Jersey app on Tomcat 7.0.50 with Eclipse 4.3 and Maven 3.0.4

It took me the past 2 days to learn what Maven is and how to use it in Eclipse; what Jersey is, and how convenient to use it to implement a JAX-RS app on Tomcat; and what's new in Servlet 3.0, and how to deploy an app without a web.xml.

Maven is the apt-get for jars. Descriptor-less deployment seems to make plug-n-play more easily. JAX-RS annotations make REST on Servlet platform simpler.

Alright, after several experiment failures, I figured out a way to get Jersey working on Tomcat with help from Maven and Eclipse.

So real stuff:
  1. Create a "Dynamic Web Project".
  2. Right click on the new project, "Configure" > "Convert to Maven project...".
  3. Add Jersey dependency to pom.xml: (this MUST be added with a "compile" scope, "provided" will fail to let Tomcat discover the REST app; for other containers/platforms, read this)
    groupId: org.glassfish.jersey.containers
    artifactId: jersey-container-servlet
    version: 2.5.1
  4. Save pom, Maven update.
  5. Create a class extends javax.ws.rs.core.Application, annotated with javax.ws.rs.ApplicationPath.
  6. Create a class, annotated with javax.ws.rs.Path. Individual methods of this class should be properly annotated with javax.ws.rs.GET etc. for handling requests.

2013-03-13

Debian Wheezy Net-install log

During net-install CD
system base
SSH server
laptop
system standard utils

Post-install
sudo
vim
iceweasel
lightdm
xfce4
xfce4-goodies
network-manager-gnome

2013-03-12

GPG Error: NO_PUBKEY

gpg --keyserver pgpkeys.mit.edu --recv-key  010908312D230C5F      
gpg -a --export 010908312D230C5F | sudo apt-key add -
 
Reference:
http://en.kioskea.net/faq/809-debian-apt-get-no-pubkey-gpg-error 

2013-02-24

Install LMDE (201303 Cinnamon RC x64) with dm-crypt

# variables that could be changed
LVM_NAME=lvm_luks
VG_NAME=vg_luks
LV_ROOT_NAME=lv_root
LV_SWAP_NAME=lv_swap
LV_ROOT_NAME=lv_root
SWAP_SIZE=2048
SDA=sda

sudo cfdisk /dev/${SDA}
# create 100M for /boot; and and rest for encryption 
sudo apt-get install -y cryptsetup lvm2
sudo modprobe dm-crypt
cryptsetup luksFormat --cipher aes-xts-plain64 --key-size 512 --verify-passphrase /dev/${SDA}2
# type UPPER case YES, then the password for encryption
sudo cryptsetup luksOpen /dev/${SDA}2 ${LVM_NAME}
sudo pvcreate /dev/mapper/${LVM_NAME}
sudo vgcreate ${VG_NAME} /dev/mapper/${LVM_NAME}
sudo lvcreate -L ${SWAP_SIZE}M -n ${LV_SWAP_NAME} ${VG_NAME} -Zn
sudo lvcreate -l 100%FREE -n ${LV_ROOT_NAME} ${VG_NAME} -Zn
sudo mkswap /dev/mapper/${VG_NAME}_${LV_SWAP_NAME}
sudo mkfs.ext4 /dev/mapper/${VG_NAME}_${LV_ROOT_NAME}
sudo mkfs.ext2 /dev/${SDA}1
sudo mkdir -p /target
sudo mount /dev/mapper/${VG_NAME}_${LV_ROOT_NAME} /target
sudo mkdir -p /target/boot
sudo mount /dev/${SDA}1 /target/boot


Start the LMDE installer, proceed, select "manually mount partitions", and install. When the installer finishes copying files and pauses:

# sudo mount -o bind /dev /target/dev
# sudo mount -t proc proc /target/proc
# sudo mount -t sysfs sys /target/sys
sudo chroot /target

sudo apt-get install cryptsetup lvm2 -y --force-yes
LVM_UUID=# find this in /dev/disk/by-uuid
sudo echo "${LVM_NAME} UUID=${LVM_UUID} none luks" >> /etc/crypttab
sudo echo "/dev/${SDA}1 / ext2 defaults 0 2" >> /etc/fstab
sudo echo "/dev/mapper/${VG_NAME}-${LV_ROOT_NAME} / ext4 defaults 0 1" >> /etc/fstab
sudo echo "/dev/mapper/${VG_NAME}-${LV_SWAP_NAME} none swap sw 0 0" >> /etc/fstab
sudo vim /etc/default/grub
# make the line reads GRUB_CMDLINE_LINUX="cryptdevice=/dev/${SDA}2:${LVM_NAME} root=/dev/mapper/${VG_NAME}-${LV_ROOT_NAME} resume=/dev/mapper/${VG_NAME}-${LV_SWAP_NAME}"
sudo update-initramfs -u -k all
sudo update-grub2
sudo grub-install /dev/${SDA}


Reboot the machine ** NOTE: I can't click on "Finish" button as what the installer tells me, which might be a bug of the installer. I had to (force) reboot the machine manually. It seems some system configuration has been done only partially. The user set up before could not be logged in. To overcome that, log in root in one of the ttys, change the password (and possibly lock root account) and log in again.

Ref:

2013-01-05

encfs with dropbox

This is from http://pragmattica.wordpress.com/2009/05/10/encrypting-your-dropbox-seamlessly-and-automatically/


May 10, 2009

Encrypting Your Dropbox Seamlessly and Automatically

Filed under: Linux,Security — bnsmith @ 8:37 pm 
A Tutorial for Ubuntu 9.04
About a month ago, I wrote an introduction to using the Dropbox service to backup your important data. Any data that you backup with Dropbox is encrypted and uploaded to Amazon’s S3 service. Unfortunately, it is the people who run Dropbox that hold the keys used to perform this encryption. Regardless of how great the service is, storing your files with Dropbox involves placing your trust in the people who currently run the Dropbox service, as well as all of the people who will ever run Dropbox in the future. This is an unacceptable risk for many people and many kinds of data.
Thankfully, there is a strategy that can greatly reduce the risk. It is possible to automatically encrypt your files, and then use Dropbox to backup the encrypted versions. This means that you can have your cake and eat it too! Dropbox provides a convenient backup strategy so that your files can’t be lost due to the theft or destruction of your laptop. The encryption software ensures that your files can’t be accessed by anyone who works for Dropbox, or any hackers that might have infiltrated the servers that Dropbox uses.
If you’re using Ubuntu, the software that you need is free, and it isn’t especially difficult to set up. Please note that this tutorial will require you to use the command-line and edit some configuration files. Don’t be afraid! I will try to explain the process in a step-by-step fashion. If you’re just getting started with Linux, this project might help you get used to the command-line a little bit.
(Note: this has been tested on Ubuntu 9.04 only; I am not confident that these exact instructions will work on older versions of Ubuntu.)
Part 1: Set Up Dropbox
The rest of this tutorial will assume that you have the Dropbox client software installed on your computer. Detailed instructions can be found in the “Installing Dropbox” section of my previous post on the Dropbox service. When you have finished following those instructions, proceed with Part 2.
Part 2: Removing Unencrypted Data
This section only applies if you have already used Dropbox to store some data that you would now like to encrypt. If you have never stored any files in your Dropbox, skip ahead to Part 3.
The first step is to take all of the contents of your Dropbox folder and back them up somewhere else. The following command will copy everything in your Dropbox into a folder named “DropboxBackup” (open a Terminal by clicking Applications -> Accessories -> Terminal):
1cp -r ~/Dropbox ~/DropboxBackup
Once everything has finished copying, it might even be a good idea to burn this folder to a CD, just to be safe. Now we can proceed to delete all of the files in the Dropbox folder. Open your Dropbox folder in the file manager by left-clicking on the Dropbox applet in the top-right. Click the “View” menu and ensure that “Show Hidden Files” is checked. Next, select all the files and hit the Delete key. Dropbox should begin synchronizing the changes. Unfortunately, once the synchronization completes, nothing will have been actually deleted yet; the files will simply be marked as deleted, but it will still be possible to recover them.
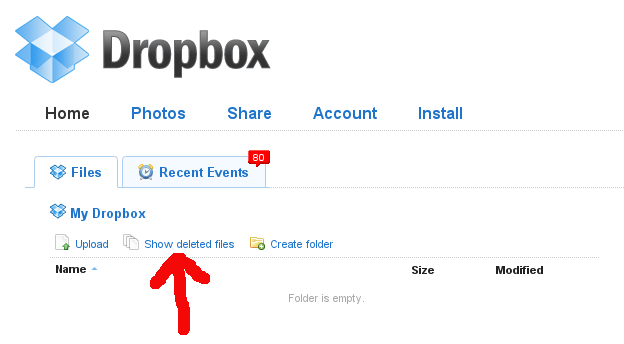
In order to actually get rid of the files, open your web browser, go towww.getdropbox.com and log in. Click the “Show deleted files” button.
01_show_deleted
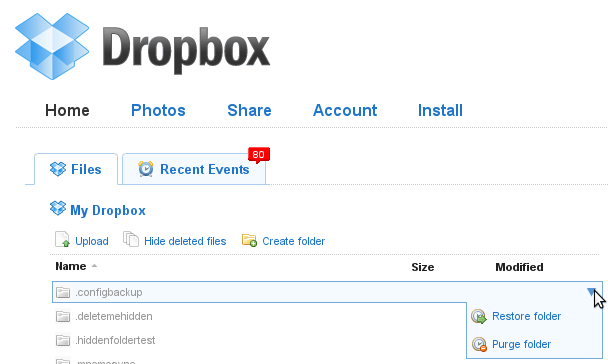
For each deleted file, select the “Purge” option.
03_purge
Part 3: Reconfiguring the Dropbox Client
The encryption software that will allow you to secure your Dropbox is called “EncFS“. It works by creating a folder in which to store an encrypted version of each of your files and folders, and then making the unencrypted names and content available in a different folder. When we are finished with this tutorial, the folder containing the encrypted files will be stored within the Dropbox folder, and will therefore be automatically backed-up. Since we don’t want to accidentally store any non-encrypted files in the Dropbox folder, we will move the real Dropbox folder to a hidden location.
Right-click on the Dropbox applet and choose “Preferences…”; under the “Main” tab, click “Move…”:
05_move
Move to your Home Folder and click the “Create Folder” button. Give the new folder the name “.dropbox_encrypted” and click “Open”. Close the preferences window. On to Part 4!
Part 4: Configure an Encrypted Filesystem with EncFS
Now we’re ready to actually do some encrypting. In the commands that follow, you will need to substitute your username in place of <>. Open a terminal and enter these commands:
1sudo apt-get install encfs libpam-mount
2sudo adduser <<yourusername>> fuse
(As an example, if your username is “pragmattica”, then the command just above should be sudo adduser pragmattica fuse)
Now you need to log out and log back in again before continuing. Next, run this command:
1encfs ~/.dropbox_encrypted/Dropbox/encrypted ~/Dropbox
06_terminal
The encryption software will ask you a series of questions. Enter the following responses:
  • Enter ‘y’ to create the encrypted directory
  • Enter ‘y’ to create the unencrypted directory
  • Enter ‘x’ to choose expert Mode (I experimented with the pre-configured paranoia mode, but encountered performance issues)
  • Enter ’1′ to use the AES cipher algorithm
  • Enter ’256′ for the key size
  • Enter ’1024′ for the block size
  • Enter ’1′ for block filename encoding
  • Enter ‘y’ for filename initialization vector chaining
  • Enter ‘n’ for per-file initialization vectors
  • Enter ‘n’ for block authentication code headers
  • Enter ‘y’ for file-hole pass-through
  • Enter and repeat the password for the new encrypted filesystem; in order for the next part of the tutorial to work, the password must be the exact same password that you use to log in to your computer after turning it on
I’m probably not telling you anything that you don’t already know, so I’ll be brief. A good password should consist of upper and lower-case letters, numbers and punctuation characters. It should be fairly random looking, and pretty long; more than 20 characters, preferably.
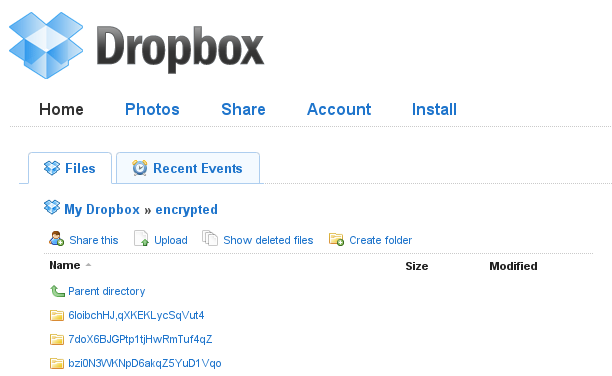
You can now begin copying files into your /home/<>/Dropboxdirectory. The files that you copy in should be encrypted and backed-up by Dropbox. If you log in to the Dropbox website, all of the saved files should have meaningless gibberish names and encrypted contents.
08_gibberish
Part 5: Use pam_mount to Automatically Mount Your Encrypted Filesystem
At this point, it would be possible to use the command-line to manually mount your encrypted filesystem every time you turn your computer on, but we can do better. A program named “pam_mount” can automatically mount the filesystem as soon as you log in. Open a terminal and enter this command:
1sudo gedit /etc/security/pam_mount.conf.xml
Look for the line:
1
Right beneath that line, add this new line:
1<volume user="<>" fstype="fuse" path="encfs#/home/<<yourusername>>/.dropbox_encrypted/Dropbox/encrypted" mountpoint="/home/<<yourusername>>/Dropbox" />
To eliminate a harmless but annoying error message, use “sudo gedit” as above to edit the /etc/pam.d/common-pammount and /etc/pam.d/common-auth files and eliminate all occurrances of the word use_first_pass.
The next time you turn your computer on and log in, you should be able to go to your new /home/<>/Dropbox folder and see the unencrypted versions of your important files. Unfortunately, this new folder won’t display the little status icons on each file, so you’ll have to keep an eye on the Dropbox applet to know when the synchronization of your files is in progress or complete. I think that this is a very reasonable sacrifice for the additional security.
One last tip: the icon for your secure Dropbox folder is now the same as for every other folder. To give that folder some visual distinction, it’s possible to change its icon. Right-click on the folder and select “Properties”. Click on the little Folder icon in the top-left of the properties dialog box and set the icon to/usr/share/icons/hicolor/64×64/apps/dropbox.png.
07_new_icon
Security Considerations
As an added benefit, this strategy will also provide a little protection against your information being compromised by someone who steals your laptop. The reason this only provides a little protection is due to the tendency of modern operating systems and software to scatter bits of information about while working. The actual files themselves are encrypted, but unencrypted bits of the files might still end up lying around in temporary files or the swap partition. An attacker with enough skill and determination would be able to find those. Still, it’s better than nothing.
This is probably going to be my last security-related post for a while. I’ve been going through a security phase lately, but I’m feeling pretty good about the precautions that I now have in place. Next post, I will be back to my regularly scheduled programming topics. As always, if you have any problems with anything in the tutorial, just leave a comment. I’m always happy to help.